Please refer to the newer version at https://ap.qut.ecoacoustics.info/tutorials/01-usingap/practical or to our documentation in general at https://ap.qut.ecoacoustics.info/
Preface
This is the practical component for Workshop 7 at the 2018 Ecoacoustics Congress.
This practical will guide you through:
- Downloading a copy of AnalysisPrograms.exe
- Opening and using a terminal
- Calculating acoustic Indices for your data
- Running an acoustic event recognizer on your data
After the completion of this practical you can find more documentation and resources from our documentation
Please note:
- AnalysisPrograms.exe will be frequently abbreviated to AP.exe in this document.
- You will need a laptop to do this practical. If you don’t have one please find a buddy and work through the examples together.
- If you need help please let one of our helpers know.
- If your internet is slow or not working, our helpers have copies of this practical, AP.exe, and some test data on USB that they can share with you.
- There are also Orchestrating, Tips and Tricks, and Glossary sections at the end of this document.
Contents
- Downloading AP.exe
- “Install” AP.exe
- Installing Dependencies
- Preparing the data
- Opening a Terminal
- Running AP.exe and getting help
- Change directories
- Calculating Indices
- Running an Event Recogniser
- End of practical
- Orchestrating AP.exe with scripts
- Tips & Tricks
- Glossary
- Footnotes
Downloading AP.exe
- Go to the following link in a web browser:
https://github.com/QutEcoacoustics/audio-analysis
- Tip: it is a good idea to open links in a new tab so you don’t lose this practical!
- Click the Releases link
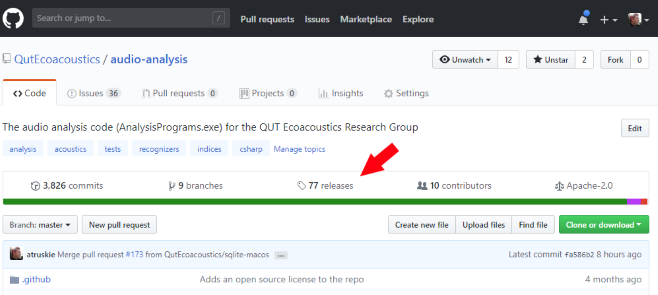
- Find the latest release (it will be at the top)
- Under the Assets section, click on the Zip file that has Release in the
name
- e.g.
Release.18.6.3.3
- e.g.
- The file should now be downloading. You can close the tab once the download has finished.
“Install” AP.exe
There is no installation process for AP.exe. Once downloaded it can be run from anywhere on your computer.
However, for this practical you should follow these instructions:
- Open the folder containing the download (typically your Downloads folder)
- Right-click on the file and choose Properties
- Make sure the file is unblocked by clicking on the Unblock button
- If you are on Windows 10, the Unblock option will be a checkbox: check it.
- Close the properties window
- Extract the zip file by right clicking on the file and choosing Extract All
- Change the destination folder to
C:\AP - Click Finish
- Make sure you have unzip installed
sudo apt-get install unzip
- Unzip the file to your home directory (your download folder location may be different)
unzip ~/Downloads/Release.18.6.3.3.zip -d ~/AP
- Open the folder containing the download (typically your Downloads folder)
- Double click on the Zip file to extract it
- The contents of the zip will be extracted to a folder next to the Zip file.
- That folder will have the same name as the Zip file
- Copy extracted folder
- Go to your home folder
- Paste the folder
- Finally rename the folder to
AP- e.g. If it was named
Release.18.6.3.3then rename it toAP
- e.g. If it was named
Installing Dependencies
- If you are using Windows 10, you can skip this step
- If you are using Windows 7, may need to install .NET 4.6.2
- Skip this step for now. If AP.exe does need this install it will ask for it
- You will need Mono version 5.5 or greater
- Go to the Mono download website for instructions: https://www.mono-project.com/download/stable/#download-lin
- Since every Linux is different, you’ll need to install these tools yourself
- ffmpeg
- wavpack
- libsox-fmt-all
- sox
- shntool
- [optional] mp3splt
- libav-tools
- Here is an example that will work with
aptpackage managers:apt-get update && apt-get install -y curl gnupg apt-transport-https unzip \ readline-common software-properties-common \ wavpack libsox-fmt-all sox shntool libav-tools ffmpeg # link ffmpeg to /usr/bin/local ln -s /usr/bin/ffmpeg /usr/local/bin/ffmpeg ln -s /usr/bin/ffprobe /usr/local/bin/ffprobe
- You will need Mono version 5.5 or greater
- Open this link in your browser: https://www.mono-project.com/download/stable/#download-mac
- Click the Download Mono 5.12.0 (Stable channel) button
- Download the application (a .pkg file)
- Once downloaded, install the application
- If the download is too slow, our helpers have copies of the package on USB drives they can share with you.
- Please note: We do not support processing MP3 on Mac OS X at the moment
- (This will be fixed in #172)
Preparing the data
Our data
If you have not brought any data with you, don’t worry, you can use some of ours. This data was generously donated for this workshop by Liz Znidersic (@LizZnidersic). Liz’s data is licensed under a Creative Commons Attribution license.
If you are waiting for the data to download, you can skip to the next sections and come back to this section when the download finishes.
Important: If the download is too slow, our helpers have copies of the data on USB drives they can share with you.
Your data
If you want to use your own data, then select one file to work with. We recommend choosing a short (1-2 hour) WAVE file. It will take approximately 5 minutes to process a 2-hour file.
Once you have chosen a file, copy it to a place that is easy to find. We
recommend C:\Temp\Workshop for Windows, or somewhere in your user folder for Linux and
Mac OS X (e.g. ~/Workshop)
If you use your own data you’ll need to substitute the filenames in the following commands for your own filenames.
Opening a Terminal
A terminal is a text-based interface for working with a computer. Instead of a graphical user interface, where you interact with graphics using a mouse, in a terminal you interact with your computer by reading text and typing commands.
Many of you would have seen or heard of terminals before. If you’ve ever seen a DOS prompt, or CMD, PowerShell, Bash, or Terminal, then you have seen a terminal.
AP.exe is a console program—that is it only works inside a terminal. It is built this way because it is designed to be used by other programs. If AP.exe had a graphical interface it would be hard for other programs to use it.
To open a terminal:
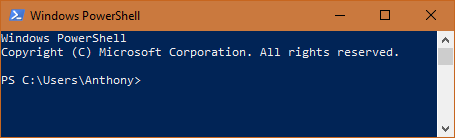
- Press the Windows key
- Type PowerShell
- Press Enter or click on the Windows PowerShell icon
- The exact steps vary based on your distribution
- For example, in Ubuntu: https://www.wikihow.com/Open-a-Terminal-Window-in-Ubuntu
- Generally:
- Open your application finder
- Search for Terminal
- Open the Terminal app
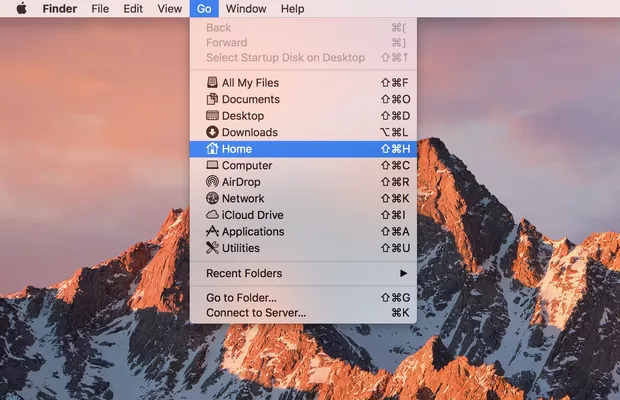
- Click the Finder icon in your dock.
- Click Go.
- Click Utilities.
- Double-click Terminal.
You should now see a screen with some text on it. It should look like one of these (don’t worry if the colours are different):
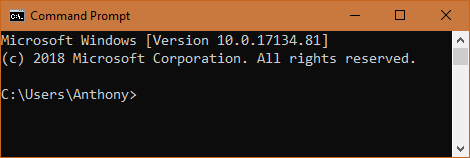
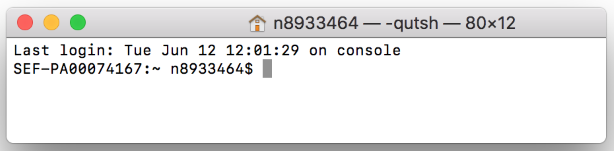
The last line shown is called a prompt. It is asking (prompting you) for a
command. On Windows machines the prompt will always end with a >
(right angle bracket). On Linux and Mac OS X the prompt will always end with a $
(a dollar sign).
Try typing a command in the terminal:
- Type the following
echo "Hello world"
- To execute the command, press Enter
Important tip: You can run the previous command again by pressing the ↑ (up arrow) on your keyboard to recall the last command and then by pressing Enter to run it again. You can edit the command before you run it again.
Running AP.exe and getting help
In your terminal type the following and press Enter:
C:\AP\AnalysisPrograms.exe
mono ~/AP/AnalysisPrograms.exe
mono ~/AP/AnalysisPrograms.exe
Congratulations! You’ve just run AP.exe for the first time. Because we did not supply any parameters it defaulted to printing out the main help text.
AP.exe has many different commands of its own. Each one has its own specific help documentation.
Try getting help for a few of them by typing the command name and adding a
--help option afterwards. Read through the output to familiarise yourself
with what each command can do, however, don’t worry if you don’t understand it all.
Let’s see how the AudioCutter command works:
C:\AP\AnalysisPrograms.exe AudioCutter --help
mono ~/AP/AnalysisPrograms.exe AudioCutter --help
mono ~/AP/AnalysisPrograms.exe AudioCutter --help
Now, let’s see how the EventStatistics command works:
C:\AP\AnalysisPrograms.exe EventStatistics --help
mono ~/AP/AnalysisPrograms.exe EventStatistics --help
mono ~/AP/AnalysisPrograms.exe EventStatistics --help
Some of our commands like audio2csv can do many different types of analyses.
Try running the following:
C:\AP\AnalysisPrograms.exe AnalysesAvailable
mono ~/AP/AnalysisPrograms.exe AnalysesAvailable
mono ~/AP/AnalysisPrograms.exe AnalysesAvailable
Unlike our other commands, the sole purpose of this command is to list what
AP.exe can do. That’s why we didn’t need a --help option. We call these
sorts of commands meta commands. The AnalysesAvailable command lists all the
analyses that can be run in the audio2csv command.
Change directories
When you double click a folder in Windows Explorer (or Finder on Mac OS X), the current directory changes to the folder you clicked on. (Directories and folders are synonyms).
You if you have used R you may have used the setwd function. It to changes the
current directory.
In your shell, change directory to our demo data folder:
cd C:\Temp\Workshop
cd ~/Workshop
cd ~/Workshop
To prove you changed folder, try asking which directory you are currently. Run the following command to print your current directory:
# If you're using PowerShell
pwd

# If you're using CMD
cd
pwd
pwd
Calculating Indices
The indices analysis uses the audio2csv command and the Towsey.Acoustic.yml1
config file. The audio2csv command is named internally Analyse Long Recording
(which is a much better name) because it aptly describes what it does: it
takes one long recording, splits it up into chunks, and runs an analysis of each chunk.
Which analysis is run depends on which config file is used. The available analyses
that can be used are listed by the AnalysesAvailable command (you ran it just before).
Let’s get some help on the audio2csv command:
C:\AP\AnalysisPrograms.exe audio2csv --help
mono ~/AP/AnalysisPrograms.exe audio2csv --help
mono ~/AP/AnalysisPrograms.exe audio2csv --help
If you piece all the bits of the documentation together you can see how you might use this command. But today, don’t worry, we’ve done it for you! The command to generate indices looks like this:
C:\AP\AnalysisPrograms.exe audio2csv SM304256_0+1_20151114_030000+1100.wav Towsey.Acoustic.yml .\IndicesOutput
mono ~/AP/AnalysisPrograms.exe audio2csv SM304256_0+1_20151114_030000+1100.wav Towsey.Acoustic.yml ./IndicesOutput
mono ~/AP/AnalysisPrograms.exe audio2csv SM304256_0+1_20151114_030000+1100.wav Towsey.Acoustic.yml ./IndicesOutput
To break that command down:
- First, we choose to run the
audio2csvcommand - Then, the first argument is the path to the file we want to analyze
- Then, the second argument specifies which configuration file to use
- Remember, the configuration file determines which analysis is run
- And finally, the last argument specifies a folder where we want to store the output
Go ahead and run that above command. You’ll need to wait a few minutes while it runs.
- If the command works the last line printed should be a
SUCCESSmessage. - If the command does not work an error should will be printed.
- If you do get an error ask one of our helpers for advice.
When the command has finished, you can see the results in Windows Explorer (for Windows),
or in Finder (for Mac OS X). You’ll find the results in the Workshop folder.
Understanding Indices Results
The output for the indices analysis is a series of files. You should find these
files in the Towsey.Acoustic directory.
There are, broadly speaking, four types of files in this folder:
- Images
- A Summary Indices CSV file
- Spectral Indices CSV files
- Metadata files
The most interesting category is the images. The image we always look at first is
the 2Maps image (for the demo file it should be named SM304256_0+1_20151114_030000+1100__2Maps.png).
The 2Maps image shows two false-color spectrograms, each with it’s own color map
(hence “two maps”). A color map is a mapping of a spectral index to a color channel.
In our example:
- Color Map 1 maps ACI, ENT, and EVN to the Red, Green, and Blue colour channels respectively
- Color Map 2 maps BGN, PMN, and R3D to the Red, Green, and Blue colour channels respectively
Using all these different indices, in two images, is useful because the different combinations of indices yield different views into the recording. Sometimes one view is more useful than the other.
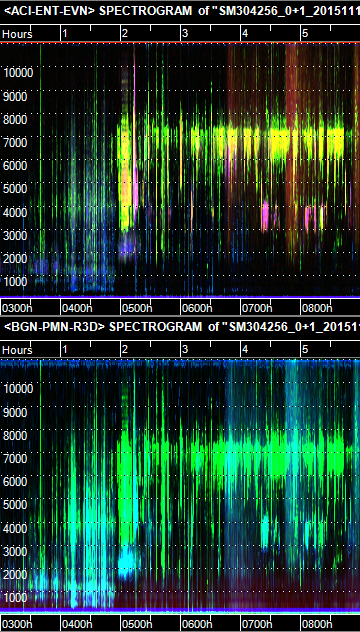
Most of the other images in this folder show either one color map, or just one spectral index as an image.
If you’re interested in analyzing your data then take note of the Towsey.Acoustic.Indices.csv
file (in this demo it should be named SM304256_0+1_20151114_030000+1100__Towsey.Acoustic.Indices.csv).
This file contains a variety of acoustic indices calculated for each minute of the
data. Each row has the values for the associated minute.
The spectral indices are also saved. Each spectral index is a matrix and given
the nature of CSV must be saved to its own file. For example SM304256_0+1_20151114_030000+1100__Towsey.Acoustic.ACI.csv
contains spectral ACI. Each row has the values for a minute of the data. The
columns have the data for each frequency band.
Tips:
- All results are calculated from the start of recording. Thus if your recording
starts at 23 seconds past the minute, each result minute thereafter will also
start at 23 seconds past the minute. There are options in
audio2csvto change this behaviour. - You can change
IndexCalculationDurationparameter in theTowsey.Acoustic.ymlfile to change the resolution at which the indices are calculated. For more information on changing config files, see the Config Files section below. - Generally we expect people will need to post-process these files (e.g. in R)
- The images have no padding on their sides. Thus, in a pinch, images from consecutive files can be simply placed next to each other to simulate a single continuous image.
- We recommend you do not aggregate data files together to create a composite view of a day of data. A good general principle is to not obfuscate the provenance of your data.
Running an Event Recogniser
Our Event Recognisers also use the audio2csv command2. This
means that to run an event recogniser we don’t have to change much from our last
example:
C:\AP\AnalysisPrograms.exe audio2csv SM304256_0+1_20151114_030000+1100.wav Towsey.LewiniaPectoralis.yml .\EventOutput
mono ~/AP/AnalysisPrograms.exe audio2csv SM304256_0+1_20151114_030000+1100.wav Towsey.LewiniaPectoralis.yml ./EventOutput
mono ~/AP/AnalysisPrograms.exe audio2csv SM304256_0+1_20151114_030000+1100.wav Towsey.LewiniaPectoralis.yml ./EventOutput
We changed the last two arguments in this command:
- We have changed the config file from
Towsey.Acoustic.ymltoTowsey.LewiniaPectoralis.yml- This means
audio2csvwill now run the Lewin’s Rail recogniser
- This means
- We changed the output directory so we could store the results somewhere else
Go ahead and run that command. You’ll need to wait a few minutes for it to run.
When the command has finished, you can see the results in Windows Explorer (for Windows),
or in Finder (for Mac OS X). You’ll find the results in the Workshop folder.
Understanding Event Recogniser Results
Similarly to the indices analysis, you’ll find the results of the recogniser in
a sub-directory, this time named Towsey.LewiniaPectoralis.
The output for this analysis is simpler:
- There is an Events CSV that contains all the acoustic events detected
- There are some “Event Indices” related files
- And there are detection files
- For each minute where an event was found is:
- A diagnostic spectrogram that shows the events
- The segment, the minute of audio, where the event was found
- For each minute where an event was found is:
Have a look through some of the diagnostic images. There are some true and false positives in this data.
The Events CSV can be confusing. These tips should be helpful:
- Each row in the CSV is a separate event detection
EventStartSecondsis left edge of the detected event. It is defined as the number of seconds from the start of the entire audio recording to the start of the detected event- The
Scorecolumn is a rough estimate of our confidence in the detection, from0.0to1.0
Tips:
- You can configure (in the config files) when (or if it all) the debug spectrograms and segmented WAVE files are saved. To save space, it is usually best to disable this extra output when analyzing a lot of files
- Most of our event recognisers have settings that can be tweaked. Tweaking these settings will usually result in better detection results, however, changing them can be cumbersome because each tweak requires the recogniser to be run again. We recommend automating a parameter sweep.
End of practical
This is the end of the practical today. Thanks for coming to our workshop.
There are some optional additional sections below you can try out or read through if you have finished early. Don’t delete the demo data just yet though.
If you’re finished you may want to delete the files and data we used today.
- To remove the demo data (and all results)
- Delete
C:\Temp\Workshop - Delete
Workshop7Data.ziporSM304256_0+1_20151114_030000+1100.wavfrom your downloads folder
- Delete
- To remove AP.exe
- Delete
C:\Temp\AP - Delete
Release.18.6.3.3.zip
- Delete
- To remove the demo data (and all results)
- Delete
~/Workshop - Delete
Workshop7Data.ziporSM304256_0+1_20151114_030000+1100.wavfrom your downloads folder
- Delete
- To remove AP.exe
- Delete
~/AP - Delete
Release.18.6.3.3.zip
- Delete
- To remove the demo data (and all results)
- Delete
~/Workshop - Delete
Workshop7Data.ziporSM304256_0+1_20151114_030000+1100.wavfrom your downloads folder
- Delete
- To remove AP.exe
- Delete
~/AP - Delete
Release.18.6.3.3.zip
- Delete
Orchestrating AP.exe with scripts
Both the examples we looked at today only processed one file. In reality you will want to process many files. AP.exe very specifically avoids batch processing of files because we don’t want to make assumptions about how your data is stored or how it should be computed. This is especially important in universities that use PBS (Portable Batch System) compute clusters—assumptions in how data is processed vary a lot.
The solution is to script AP.exe. You can script AP.exe with any language you like. This section will demo three examples of scripting AP.exe with PowerShell, R, and Bash. Each of the examples does the same thing: they generate indices for the files in a folder.
All of these examples (and languages) will work on Windows, Mac, or Linux. This practical will not provide an in depth guide to using these languages. However, even if you can’t run them, reading through the examples should still prove useful.
We have a collection of scripts at https://github.com/QutEcoacoustics/audio-analysis/tree/master/scripts. The collection is currently rather small, but if you need an example script, let us know and we’ll write one for you. We’re also interested in gathering examples from others!
Scripting with PowerShell
# Set the directory containing the files
$directory = "C:\Temp\Workshop"
# The directory to store the results
$base_output_directory = "C:\Temp\Workshop\BatchIndicesOutput"

# Get a list of audio files inside the directory
# (Get-ChildItem is just like ls, or dir)
$files = Get-ChildItem "$directory\*" -Include "*.mp3", "*.wav"

# iterate through each file
foreach($file in $files) {
    Write-Output ("Processing " + $file.FullName)

    # get just the name of the file
    $file_name = $file.Name

    # make a folder for results
    $output_directory = "$base_output_directory\$file_name"
    mkdir $output_directory

    # prepare command
    $command = "C:\AP\AnalysisPrograms.exe audio2csv `"$file`" `"Towsey.Acoustic.yml`" `"$output_directory`" -n"

    # finally, execute the command
    Invoke-Expression $command
}
Scripting with R
# Set the directory containing the files
directory <- "C:\\Temp\\Workshop"
# The directory to store the results
base_output_directory <- "C:\\Temp\\Workshop\\BatchIndicesOutput"

# Get a list of audio files inside the directory
# (Get-ChildItem is just like ls, or dir)
files <- list.files(directory, pattern = "*.wav", full.names = TRUE)

# iterate through each file
for(file in files) {
  message("Processing ", file)

  # get just the name of the file
  file_name <- basename(file)

  # make a folder for results
  output_directory <- normalizePath(file.path(base_output_directory, file_name))
  dir.create(output_directory, recursive = TRUE)

  # prepare command
  command <- sprintf('audio2csv "%s" "Towsey.Acoustic.yml" "%s" ', file, output_directory)

  # finally, execute the command
  system2('C:\\AP\\AnalysisPrograms.exe', command)
}
Scripting with Bash
#!/usr/bin/env bash

# Set the directory containing the files
DIRECTORY=~/Workshop
# The directory to store the results
BASE_OUTPUT_DIRECTORY=~/Workshop/BatchIndicesOutput

# Get a list of audio files inside the directory
# The `-1` option outputs one file per line
FILES=$(ls -1 $DIRECTORY*.wav)

# iterate through each file
for file in FILES; do
    echo "Processing $file"

    # get just the name of the file
    filename=`basename $file`

    # make a folder for results
    output_directory="$BASE_OUTPUT_DIRECTORY/$filename"
    mkdir -p $output_directory

    # prepare and execute command
    mono ~/AP/AnalysisPrograms.exe audio2csv "$file" "Towsey.Acoustic.yml" "$output_directory"
done
Tips & Tricks
1. Versioning of AP.exe
We release updates to AP.exe frequently. It is important that you check for updates and can also understand the version numbers. Go to https://github.com/QutEcoacoustics/audio-analysis/blob/master/docs/versioning.md to read more about how we version AP.exe.
2. Customising Config Files
Nearly every command and analysis can be customised with a config file. To read more about customising config files, please go to https://github.com/QutEcoacoustics/audio-analysis/blob/master/docs/config_files.md
3. Dates and Times in Filenames
We only support some date formats. For more information on what date formats we support please go to https://github.com/QutEcoacoustics/audio-analysis/blob/master/docs/dates.md
4. Absolute Paths
To make this practical easier for you to type out, we used a lot of relative paths. A relative path is a filename that only points to the correct file if you are in the correct folder. That is your current directory is relative to the file.
An absolute path is filename that is always correct no matter what your current
directory is. On Windows, absolute paths always start with a drive letter (e.g.
C:\… or D:\… etc). On Linux and Max OS X absolute paths will always start
with a forward slash (e.g. /…).
We recommend you always use absolute paths for programming tasks. This is especially important for scripting/orchestrating AP.exe. Using absolute paths helps to avoid a whole class of easy to make mistakes—which can be amplified when you start working at scale!
5. Recorder Schedules
For continuous recordings we recommend:
- 4 x 6 hour files, scheduled at
- 00:00
- 06:00
- 12:00
- 18:00
- OR 4 x 6 hour files, scheduled at
- 03:00
- 09:00
- 15:00
- 21:00
This schedule is the best format for creating long-duration false-color index spectrograms. The second format is particularly good for ensuring the dawn-chorus is captured as a whole recording.
The longer the deployment, the more we prefer longer files. Every additional file creates overhead in processing and storage. This is especially true for Ecosounds which manages over 500 000 recordings!
There are drawbacks to creating longer files. The biggest is that it can be harder to manipulate the files manually (say in Audacity which inefficiently requires an entire file to be loaded before processing can begin). It is best you design your protocol around what you need:
- If you intend to sample your data and analyze it manually, for small projects, then shorter files are fine
- If you’re capturing months of data, go for larger files and find methods for dealing with the scale. Most audio collected at scale will never be listened to manually so it is important to optimize for automated processes rather than human listeners.
We also strongly recommend you test your schedules before your deploy. Dealing with data that does not start at the zeroth second of a minute can be surprisingly frustrating.
6. Adding AP.exe to PATH
If you plan to use AP.exe a lot, this extra “install” step will make it easier to use.
Please go to
https://github.com/QutEcoacoustics/audio-analysis/blob/master/docs/path.md
7. Maintaining provenance with log files
AP.exe writes a log of all actions taken to log.txt file. We recommend you
always save this log along with your results because it contains important
information about the analysis.
For more information go to https://github.com/QutEcoacoustics/audio-analysis/blob/master/docs/logs.md
8. Bugs and support
AP.exe has many bugs. This is pretty normal for research software. If you find something that doesn’t work, please let us know by filing an issue at https://github.com/QutEcoacoustics/audio-analysis/issues
We’re interested in new features however we primarily develop AP.exe for our own needs. If a new feature is requested that is not needed by us, where possible we’ll consider implementing it. However we do not have the capacity to fully support AP.exe as a product.
Glossary
- AnalysisPrograms.exe
- A program produced by QUT Ecoacoustics to analyse long duration recordings of the environment
- Often referred to as AP.exe
- Audio Recording
- A single audio file. Typically, a WAVE file
- Acoustic Event
- An interval of acoustic energy, above the background noise level, emitted from a single source
- Acoustic Index
- A summary statistic that describes some feature of an audio recording, typically different aspects of the distribution of acoustic energy for a defined period
- Spectral Index
- Same as an acoustic index, but produces a spectrum of values
- False colour spectrograms
- Also known as False Colour Multi-Index Spectrograms, Index Spectrograms, Long Duration False Colour Spectrograms
- A visualisation of audio data, derived from a triplet of three spectral acoustic indices, each assigned to a particular colour channel
Footnotes
-
Why is our acoustic indices analysis named
Towsey.Acoustic? Our naming format is<author>.<analysis_name>. In this case the authorTowsey(Michael Towsey) created an analysis namedAcoustic. We also abbreviated the name fromTowsey.AcousticIndicesto make it shorter. Don’t worry we think the name is bad as well, it’s just too late to change it! ↩ -
There are some other commands, like
EventRecognizerandAED, that can be used to run event recognisers but we recommend you do not use them. They are intended to be used for testing and debugging only. ↩